Sunday, 30 October 2011

Cupcakes, creatures and Holly Bell!


This isn't a recipe today, but I HAD to share with you my day out yesterday with none other than the very lovely Holly Bell.

I had a truly amazing day yesterday (29th). Two reasons; it was my mum's 74th birthday and we had a family meal out, but before that I attended a course on cupcake decorating with Holly Bell (one of the finalists from the Great British Bake Off).


The theme of the day was creatures & flowers. We were welcomed by the very smily (and very genuinely warm & friendly) Holly at Bridge 67 Cookery School in Smeaton Westerby, Leics. We enjoyed a bite of breakfast over coffee, tea and juice, where we introduced ourselves and were presented with our itinerary and the most comprehensive & detailed set of instructions you could hope for.

Our day in the kitchen then began with a demonstration of Holly's recipe to make the cupcakes. Then it was our turn to make ours. 12 cupcakes made & cooling later and it was on to making the fondant decorations.

Following a demonstration and with the aid of the wonderfully detailed set of instructions, we first cut some butterflies, flowers & leaves, formed them & left the to dry. (Forgot to photograph these, sorry!)

Next came the cutest little snails. I was surprised that mine did actually look like snails and not just strange slugs, but they really did! *happy dance*


We moved on to ladybirds & rose buds, followed by tortoises and plant pots. By now we were all flying with confidence under Holly's expert guidance.


A break for lunch brought us beautifully crafted & presented sandwiches, crisps and home made biscuits to die for! There was even a glass of wine for those who wanted it!

Back into the kitchen afterwards we made buttercream that was as smooth and light you could float away as if on a cloud.

Now the assembly began! The buttercream was tinted as green as grass in the sunniest of meadows and our we 'planted' our roses and sat our ladybirds down in the sun beside them.


We rolled fondant & impressed a wood grain effect ready to place our snails; complete with a leaf or two to munch on.


Green fondant became grass on which our tortoise sat beside a pretty little plant pot of blooms.


A white full moon background became home to our owls; resting on a branch being all wise and seeing.


While others made ducks, I made robins and sat them on the sea of a swirly blue bird bath.


Holly taught us to pipe 'roses', 'swirls' and 'high hat' with buttercream on which we 'landed' our butterflies before we painted, glitzed and embellished them to shine & sparkle.


We were given lovely gold cake boxes into which we brought our creations home to share with our loved ones.


Mine came with us to the restaurant (complete with my cake stand) as a centrepiece for mum's birthday. Mum loved them & they also received admiring glances and complimentary remarks from the waiters & waitresses too.


We sadly had to leave Holly and the cookery school at 5:15pm, but not before we were each given a bag of her wonderful homemade biscuits to enjoy later with a cup of tea.


Armed with the wonderful memory of a fantastic day with a fabulous teacher in the company if some truly talented and lovely ladies, not to mention incredibly detailed notes for our future creations, we hugged and sadly said our farewells. Not goodbye but see you again in the future!

Holly, I wish you the best of everything I would hope for myself. You have a wonderful personality, a kind nature & a skill in presentation & teaching that many would envy! May your future take you to the moon & back. Your butterfly wings have grown; let them unfurl and you will fly!

Love, hugs and thanks xxx

What an amazing day!

I had a truly amazing day yesterday (29th). Two reasons; it was my mum's 74th birthday and we had a family meal out, but before that I attended a course on cupcake decorating with Holly Bell (one of the finalists from the Great British Bake Off).


The theme of the day was creatures & flowers. We were welcomed by the very smily (and very genuinely warm & friendly) Holly at Bridge 67 Cookery School in Smeaton Westerby, Leics. We enjoyed a bite of breakfast over coffee, tea and juice, where we introduced ourselves and were presented with our itinerary and the most comprehensive & detailed set of instructions you could hope for.

Our day in the kitchen then began with a demonstration of Holly's recipe to make the cupcakes. Then it was our turn to make ours. 12 cupcakes made & cooling later and it was on to making the fondant decorations.

Following a demonstration and with the aid of the wonderfully detailed set of instructions, we first cut some butterflies, flowers & leaves, formed them & left the to dry. (Forgot to photograph these, sorry!)

Next came the cutest little snails. I was surprised that mine did actually look like snails and not just strange slugs, but they really did! *happy dance*


We moved on to ladybirds & rose buds, followed by tortoises and plant pots. By now we were all flying with confidence under Holly's expert guidance.


A break for lunch brought us beautifully crafted & presented sandwiches, crisps and home made biscuits to die for! There was even a glass of wine for those who wanted it!

Back into the kitchen afterwards we made buttercream that was as smooth and light you could float away as if on a cloud.

Now the assembly began! The buttercream was tinted as green as grass in the sunniest of meadows and our we 'planted' our roses and sat our ladybirds down in the sun beside them.


We rolled fondant & impressed a wood grain effect ready to place our snails; complete with a leaf or two to munch on.


Green fondant became grass on which our tortoise sat beside a pretty little plant pot of blooms.


A white full moon background became home to our owls; resting on a branch being all wise and seeing.


While others made ducks, I made robins and sat them on the sea of a swirly blue bird bath.


Holly taught us to pipe 'roses', 'swirls' and 'high hat' with buttercream on which we 'landed' our butterflies before we painted, glitzed and embellished them to shine & sparkle.


We were given lovely gold cake boxes into which we brought our creations home to share with our loved ones.


Mine came with us to the restaurant (complete with my cake stand) as a centrepiece for mum's birthday. Mum loved them & they also received admiring glances and complimentary remarks from the waiters & waitresses too.


We sadly had to leave Holly and the cookery school at 5:15pm, but not before we were each given a bag of her wonderful homemade biscuits to enjoy later with a cup of tea.


Armed with the wonderful memory of a fantastic day with a fabulous teacher in the company if some truly talented and lovely ladies, not to mention incredibly detailed notes for our future creations, we hugged and sadly said our farewells. Not goodbye but see you again in the future!

Holly, I wish you the best of everything I would hope for myself. You have a wonderful personality, a kind nature & a skill in presentation & teaching that many would envy! May your future take you to the moon & back. Your butterfly wings have grown; let them unfurl and you will fly!

Love, hugs and thanks xxx

Thursday, 27 October 2011

UTEE

Another article I wrote ages ago was on using UTEE or, to give it it's full name, Ultra Thick Embossing Enamel.

This is such a versatile product to use, and it's not fussy what you use it on.... chipboard, metal brads and other objects.

To use it you'll need to have a heat embossing gun and an inkpad like a Versamark or other pad that stays sticky for a while. I use a cheap non-stick baking tray to put my item into to heat up my powders so that the end product doesn't stick to it. You use it pretty much the same way as you would embossing powder but it's a bit thicker and can provide the most wonderfully thick, glossy finish.


I've added a few photos to show you how it can be used.

I die cut a flower from some chipboard and painted it with gold acrylic paint. I then inked it and coated it in UTEE before melting the first layer. You can (if you're quick) pour some more UTEE on top of that layer, but as I've been burnt in the past by picking it up (and it is VERY hot!) I let it cool for a few seconds before re-inking and coating it again. The first layer tends to give an 'orange peel' kind of texture, becoming smoother the more layers you add. I find that 3 layers are adequate for a smooth, glossy finish.


On this one, I added some beads between the second and the final layer for a bit of colour and added texture.


This is simply a brad which has been triple embossed with UTEE to give a raised 'wet' look to it. Mind your fingers when heating metal - use long nosed tweezers.


It would be lovely for you to show us what you have made with UTEE.

Wednesday, 26 October 2011

Letraset Flexmarkers at the NEC

I can now officially confirm that I will be demonstrating Flexmarkers at the NEC Crafts for Christmas Show for Letraset on Saturday 5th November 2011 ;-)


I will update you on which stands / exhibitors I'll be with when I have more information.

If you're going to the NEC, then please pop by and say hello.  Hope to see you there!

Pannini with mozzarella & pesto

Another quick lunch recipe from me today:  Pannini with Sun-dried tomato pesto, tomato and Mozzarella.  Quick, easy and oh, so tasty!

Simply take:

1 pannini per person and slice horizontally
Spread generously with some Sun-Dried Tomato Pesto (my fave is by Sacla)
Top with slices of fresh tomato
Add a couple of slices of Mozzarella cheese


I make mine in my sandwich press (one with flat plates) for a few minutes until golden and the cheese has melted.


You'll find that the mozzarella cheese goes a little bit chewy, so be careful when you bite into it.


Enjoy!  x

Theft update

I've just remembered to share the details of the court case following the theft of Will's bike and our other items.

I have the thief's full name, but no doubt would get in trouble if I published it here, so in the interests of protecting the thieving little scrote bag's high moral standing in society (yeah right!), I shall simply refer to him as the 'person'.  I mean I wouldn't want to breach his Human Rights by letting you all know that this certain 'person' is a thief now, would I?

The 'person' pleaded guilty to 11 counts of theft and asked for 10 other offences to be taken into consideration (obviously he's a novice!)  He was charged with 2 counts of pedal cycle theft and 1 count of theft from a motor vehicle.

He was sentenced on 29th September as follows:

* Community Order for 18 months.
  Meaning:
  * He has to attend a programme of Thinking Skills (interpreted by us as don't be stupid and leave DNA evidence behind when you go out thieving hard working people's property, because it may just link the crime back to you!)
  * Subject to a curfew of 3 months (hopefully between the hours of 7:00am and 6:55am the following day!)
  * Supervised by the Probation Service for a rehabilitation period of 18 months. (Whatever!)

Will was awarded compensation to the HUGE value of £50 (Yep, you read it right! A measly £50). He stole over £1500 worth of stuff from us. What about the other bikes etc. that he stole and sold on?  How much did this 'person' actually sell Will's bike for, not bloody £50 that's for sure!  The compensation didn't even cover our insurance excess, let alone the hike in insurance premium that Esure are rubbing their hands together and creating for us for next year.  We will only receive this life changing fortune if and when he decides to pay it across to the Court who will then forward it on to us.

The Police did so much hard work.  Surveillance, DNA evidence, victim support and this guy only gets the above?  It's the Police I feel sorry for; we couldn't fault them.

So, to Northern Area Peterborough Police - a MASSIVE THANK  YOU!

To the Judge - WHAT A PATHETIC SENTENCE TO HAVE PASSED - THE GUY PLEADED GUILTY TO 21 CRIMES AND THE POLICE FOUND STOLEN PROPERTY IN HIS HOUSE!!! HOW MUCH EVIDENCE DO YOU NEED TO THROW THE BOOK AT SOMEONE?!

To his Lawyer - BET YOU GOT PAID A NICE FEE FROM HIS LEGAL AID THAT WE CONTRIBUTED TO!

Tuesday, 25 October 2011

Home made Hummus

I was after something quick and tasty to cook for lunch today so this is what I made.

There are lots of recipes out there for Humous (as well as lots of ways of spelling it!) This is the one that I use;

1 x 400g tin Chick peas, drained and rinsed
½tsp (2.5ml) Sea Salt (or to taste)
3 cloves of Garlic, peeled
4 tbs (60ml) Tahini paste
1 Lemon, juiced
¼tsp (1.25ml) Cayenne pepper (or to taste)
2-4tbs Soured cream

And this is how easy it is to make...

1. Place all of the above into a food processor, apart from the soured cream, and blitz to a smooth paste (this takes a few minutes).

2. Stop the processor after each minute or so and scrape down the sides to ensure that it is all evenly blended.

3. Adjust the lemon juice, salt and Cayenne pepper to your personal taste; adding a little more if necessary.  This mixture will still be quite thick.

4. Mix in a couple of tablespoons of soured cream and blend further.

5. Continue to add the soured cream, a tablespoon at a time, and then blend until you achieve the right consistency.  Personally I like it to 'blob' off the spatula.


6. Serve with hot toasted pitta breads or vegetable sticks such as carrots, celery, peppers etc.

Watercolour pencils

Quite a while back, I wrote and uploaded some instructions on how to use watercolour pencils. Here they are on my own blog...

I find them so versatile and in the right hands (not mine of course!) the results can be fantastic!!!

You don't have to spend a fortune on buying them, one set of mine came from WH Smith. You need a few brushes of different thicknesses - I have three; fine, medium and broad. I tend to use waterbrushes (the type that has a water chamber for the handle) but often use them simply with a pot of water. I say a pot but I keep two by my side; one for wetting the brush and the other for cleaning, that way you don't get any interference of colours.

Remember that water and paper/card don't normally mix too well, so remember to be sparing with the amount of water that you apply. You can always add a little more to blend your colours but you can't take it away very easily and still achieve a nice finish.

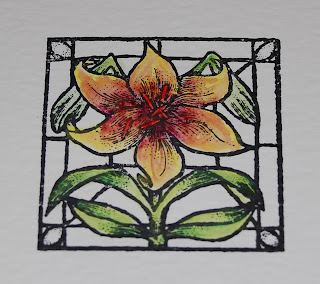
You can watercolour stamped images, backgrounds or even peel offs if you wanted to. I'm going to show you a few photos of how I've coloured in some stamped images. I've used Stazon ink as it's quick drying and not water based so won't run into your pattern.


Using your lightest colour first, colour in your image, gradually changing pencils and colours until your image is complete and the darker colours provide your shadows. You don't have to make sure that you colour every little bit of your paper as that's what the water will do for you.


Once you're happy with your colouring, wet your brush with CLEAN water and wipe against the edge of the water pot to remove most of the water from it. Starting with the lightest colour, gradually move the brush around the pencilled area until it's covered. I then move to the shaded area I'm working in as it normally contains colours that I need to blend together and the brush doesn't have to be cleaned. Colour the darkest area first, gradually moving the brush into the lighter area to blend the two colours. Remember not to make an obvious line but to keep the movement 'fluid' between the areas.


If you're then transferring to a different area and colour, remember to clean your brush. Repeat the above process until your image is complete, then allow to dry thoroughly.


You can use Twinkling H2O paints much the same way. As these are a cake of paint, I find you need to add quite a lot of water to start off with and let them stand for a few seconds to soften the surface. The more water used on H20's the more translucent the image, the less water the darker and more intense the colour.

Monday, 24 October 2011

Freya bakes

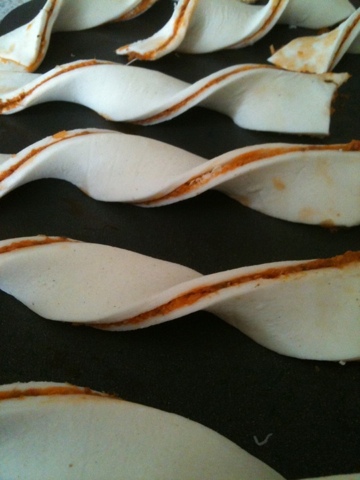
My daughter is really starting to take after me in so many ways I think. I see myself in her young years, spending time at her mother's side; learning the skills of a cook for her future years. She recently made some wonderfully tasting red pesto & Parmesan twists.

Life's too short to made puff pastry so I bought it. I directed & supervised her cutting the pack in half, then flouring, rolling, turning & rolling her pastry to make two fairly evenly sized squares.


She spread one square with the red pesto and then sprinkled that with plenty of freshly grated Parmesan. She topped it off with the other pastry square before cutting it into strips; giving each a little twist to create a lovely shape before I put them in the oven for her.


I was told when the cooking time was up to take them out of the oven (a little overbooked, but not quite burnt) before she carefully transferred them to a cooling rack.


Seal of approval given from her, her dad, brother & myself; they tasted fantastic and she did so well to make them with the absolute minimal intervention or help from me. (I can see future battles for kitchen domain coming in years to come!)

Spiced apple & sultana cake

9oz (250g) Plain Flour
2tsp (15ml) Baking powder
½tsp (2.5ml) Salt
1½tsp (7.5ml) mixed spice
4oz (110g) Granulated sugar
1 egg
5 floz (140ml) Milk
3floz (90ml) Corn oil
6oz (170g) Apple, chopped
1oz (25g) Sultanas
1oz (25g) Walnuts, chopped (optional)
2-3tbs (30-45ml) Soft brown sugar
Icing:
Juice of one lemon
Icing sugar


Oven temperature 190C / Gas Mark 5

Ok let's cook!

1. Into a large bowl, mix the flour, baking powder, salt, mixed spice and sugar together.


2. In a separate bowl/jug mix your egg, milk and oil.


3. Mix together until just combined.  Do not beat and don't worry if there's a small lump or two.  Just make sure that all the flour mix is combined.


4. Stir in the chopped apple & sultanas.


5. Don't worry that this mixture seems a little dry as the apples will release some liquid as they're cooked.


6. Pour your mixture into a greased traybake tin (or disposable foil traybake tray).  Alternatively, divide between 12 large muffin cases/wraps.


7. Sprinkle the top with the walnuts (if using) and then the sugar.


8. Bake for 20-25 minutes or until golden brown and cooked.


9. Allow to cool and then mix the lemon juice with enough icing sugar to make quite a thick icing.  Drizzle randomly over the top of the cooled cakes.


These can be served still warm from the oven or left to cool.  They're also lovely warm topped with custard or ice cream.

LinkWithin

Related Posts Widget for Blogs by LinkWithin